
SHARKIT & Baby Sharkit Instructions
- ollieoop34
- Feb 16, 2023
- 6 min read
Updated: Nov 24, 2023


Special thanks to my friend Robert Spillane for his help on these kits, building, launching and providing pictures of his build for the face card of these kits.
Model Rocketry is a fun and safe family activity.
model rocketry is a science your results may vary depending on how you build the rocket. please read the National Association of Rocketry model rocketry safety code and the model rocket handbook.
My Instructions are meant as a guide and are not a guarantee of stability or function of the product.
This rocket has been tested and proven but your results may be different.
Launching rockets can be dangerous and requires adult supervision. you use our products at your own risk. OLLIE-OOP Model Rocketry is not responsible for any damages or injuries incurred from use or misuse of our products. you are responsible for the Contruction and stability of your rocket. please follow all safety codes and launch procedures as stated by the NAR handbook.
our kits are not intended to be modified. Please use the recommended engines.
Always follow the NAR safety code at www.nar.com
Read all steps before beginning. Always dry fit the parts on every step that requires glue. And always add a reinforcing bead of glue to all joints the required glue and wipe off excess glue with your finger.
Always wear safety glasses and mask when cutting or sanding or using powder.
KIT COMPONENTS
BODY TUBE
NOSE CONE
CLAY WEIGHT
LAUNCH LUG
MOTOR MOUNT AND COMPONENTS
PARACHUTE AND COMPONENTS
FIN SET and a set of mystery fins, keep them with your other mystery parts.
DECALS
TUBE MARKING GUIDE
SHOCK CORD MOUNT

Instructions for both kits are basically the same.
If you have any questions, message me anytime.
1:
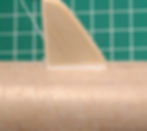
Stand the tube on end over the fin marking guide and make pencil marks on the tube at each of the lines on the guide. (I always mark the lug line with a tiny L to keep it separate.)
When finished you should have 6 fin lines. 4 AFT fins and 3 FWD fins. One of the FWD fins will line up with one of the AFT fins.
(See picture)
Now extend those marks using a door frame or T tool.
Extend the FWD fin lines and the top Aft line to 9" Place 2 marks on each of the 3 FWD fin lines one at 7" and another at 8" from AFT end of tube.
The FWD fins sit between the marks.
Extend the 4 other Aft fin lines to 5" and. Place lug under and in one of the FWD fin joints. You can choose to cut it in half and add have 2 lugs one on the corresponding AFT fin joint flush with end of tube.
For Baby Sharkit.
Repeat the same process, Place FWD fins 2.5" from AFT end of tube.
Special thanks to Randy Myers for letting me know that the instructions were missing key information.
Lightly sand the area of the tube where the fins will be attached. Redraw lines if necessary.
2: Locate the motor tube, rings and motor hook.
Using a hobby knife make a 1/8" slit at 1/4" from the end of the tube.
On the opposite end of the tube make a mark at 1/2"
With a file OR KNIFE make a small notch in the inside rig of both motor rings just big enough for the hook, about 1/16"
Test fit the rings on the tube with motor hook in the 1/8" slit, if the parts don't fit together easily, lightly sand the inside of the ring until everything fits.
Update. I have included Kevlar cord for the option to attach it to the mount. Rather than use the paper shock cord mount. Just tie one end of yellow cord around center of mount tube and feed it through the hole in the FWD ring. Put glue on the knot.


Slide the rings away from the marks and place a ring of glue around the tube just before the marks, so that when you slide the ring up to the marks the rings go through the glue.
Put a bead of glue inside the front of the tube and insert the small motor block ring until it stops on the motor hook. Set the motor assembly aside and let dry fully.
When finished it should look like the one in the picture.

3: Locate the fins and lightly sand each side, round over the leading edges and taper the trailing edges on all fins.
If you plan to fill the fins, do that now.
(I use wood filler mixed with a little water or sanding sealer)

4: Locate the motor mount assembly and test fit it in the tube, lightly sand the rings if necessary.
It needs to slide in easy.
Using a stick place a thick ring of glue around the inside of the body tube about 2" in.
Note the motor hook line and slide the assembly in the tube with one motion, don't stop until the motor mount tube is flush with the end of the body tube.
After its dry place a ring of glue around the aft ring. (A stick or long glue applicator works best)

***If you are building the baby Shark
Place rings at 1/8" from ends of tube and tie braided cord around mount and feed cord through tiny hole in on ring. If your kit has 2 mini thrust rings, use both.


Baby has 2 motor block rings use both. Make them flush with end of tube. Stand tube on end and push rings together with a toothpick. Let dry. Make sure the hole in the rings remains open and clear of glue.
5: From the motor end of the tube make marks on all 4 aft fin lines at 1/4" up
Make marks on all 3 forward fin lines at 6 7/8" from the motor end of the body tube.
6: Locate the fins and place a line of glue on the root edge of one large fin and place the end of the root edge on one of the 1/4" marks, make sure to stay on the mark and the line and the fins must be 90 degree from the body tube, straight up. keep the leading edge forward.
make sure its dry before you repeat the same process with the other 3 fins.
(Tip: Keep checking the alignment often as you go by looking down the length of the tube.)
(See pictures for example)
If the fins are dry and sturdy move on to the 6 7/8" marks and repeat the same process with the small fins, with the rear root edge at the mark and on the line. Make sure the leading edges are facing forward, let glue dry before moving to the next part. Let everything dry. 1 Will line up with one of the rear fins.


(Now add fillets, an extra line of glue on each side of each fin on the joint where the fin meets the tube, wipe off excess glue with your finger and let dry.)

7: Locate the launch lug and lightly sand it remove the gloss.
Glue it on of the joints of one of the forward fins. (See picture)
NOTE: On Baby Shark you can just use the one lug flush with the AFT end of the tube next to a fin.

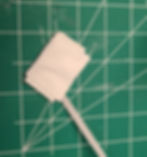
8: Cut out the shock cord and mount. Cover it with a thin film of glue using your finger.
Lay one end of the shock cord across it as seen in the picture. Then fold it 3 times.
Form it to the shape of the tube with your fingers.
Put some more glue on it and glue it about 2 inches inside the body tube, just far enough for the nose cone to have clearance. Hold it in place until it stays firmly.
Skip this step on Baby Sharkit.


9: Wash the nose cone with hot soapy water, after its completely dry roll the clay into a snake shape.
Put the clay inside the nose cone and use a dowel rod to pack it in the tip of the cone as best as you can so that the clay remains there firmly.

Wash cones with soap and water. Use plastic cement or CA on Baby nose cone base.
Pack all clay in nose cone of large sharkit. Baby does not need any.
10: Lay Parachute out and place a sticky disk at each corner. Cut a tiny x in the center of each and tie the ends of the shroud lines to each hole.
Cut 4 shroud lines each 24 inches long.


11: Tie the end of all the lines and the end of the shock cord to the loop on the swivel.
(See picture)


Note: The kit parachute doesn't come with Kevlar cord.
Toby C.
Always follow the NAR Safety Code

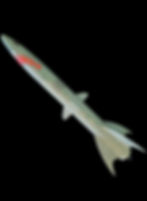

Great work Robert.
I really like how you capture the realism of the shark.
Also note the angle that Robert used on the eyes.
